Quick Start
Hands-on from the first minute: create a document, animate a bouncing ball, learn the ways in (import) and out (save, export, preview), and the document settings you will meet along the way.
Create a Document
Section titled “Create a Document”New document
Section titled “New document”When you open Pixodesk SVG Animator you land on the welcome screen. Choose the file format you want to work with, set the canvas size and the playback start, and click Create. A new animation document opens with the selected format and default settings. To start another document later, choose File › New (a new window opens).
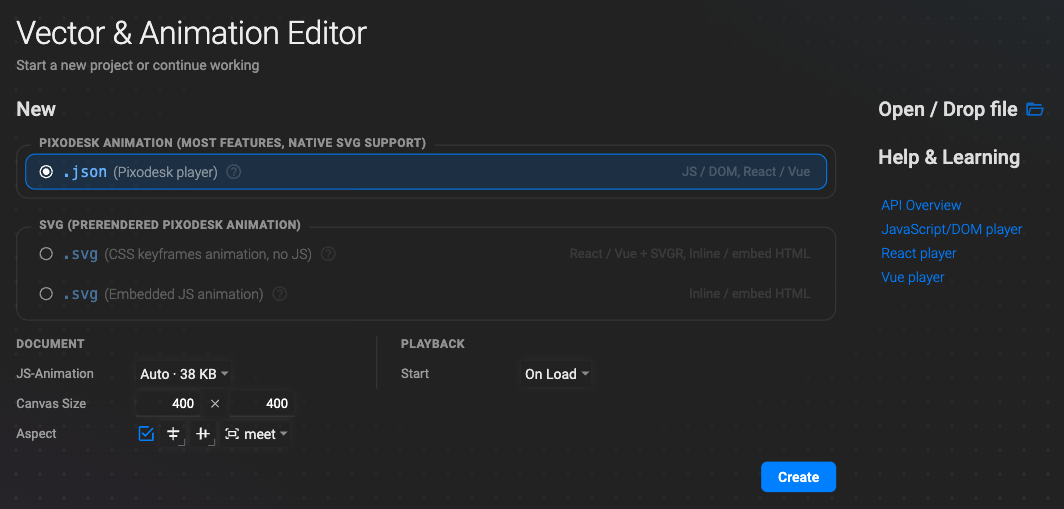
The editor supports:
- JSON file format for the Pixodesk player (“Pixodesk animation”)
- SVG file format with CSS keyframes
- SVG file format with JavaScript triggers
- SVG file format with JavaScript animation
- JSON file format for Lottie animation (save / export)
The selected format defines the initial structure and saving settings of the document. However, file formats are interchangeable — you can change the format at any time during the project. If you are creating an animation intended for multiple platforms, you can start with any format and convert it later depending on your final deployment requirements.
Open an existing file
Section titled “Open an existing file”You can open animation files created in Pixodesk SVG Animator, as well as supported SVG and Lottie JSON files, in several ways.
Drag and drop
Section titled “Drag and drop”Drag an animation file from your file system and drop it directly onto the editor window. A dialog appears with options for how the file should be handled:
- Open File — opens the dropped file as a new document. If the current window is empty, the file opens in the same window; if a project is already open, the file opens in a new window.
- Add Content — imports the dropped animation into the currently open document. The imported animation is added as a group, preserving its structure and animation data.
- Replace Content — replaces all existing content in the current document with the content from the dropped file. The previous animation content is removed.
From the file system
Section titled “From the file system”Double-click an animation file in File Explorer (Windows) or Finder (macOS) to open it in the editor, or right-click it and choose Open With › Pixodesk SVG Animator.
Open command and Open Recent
Section titled “Open command and Open Recent”Choose File › Open (⌘ / Ctrl + O) and navigate to the file, or File › Open Recent and
pick a document from the list of recently opened files.
To add a file to the current document instead of opening it, see Import files.
The file types themselves — and which to choose — are explained in File formats: which one to save; the document’s settings in Document properties.
Your First Animation
Section titled “Your First Animation”Ten minutes, one bouncing ball, every part of the workflow once. Follow along in a new document.
1. Create the document
Section titled “1. Create the document”On the welcome screen keep .json (Pixodesk player), canvas 400 × 400, and click Create. (Any type works — you can change it later.)
2. Draw the ball
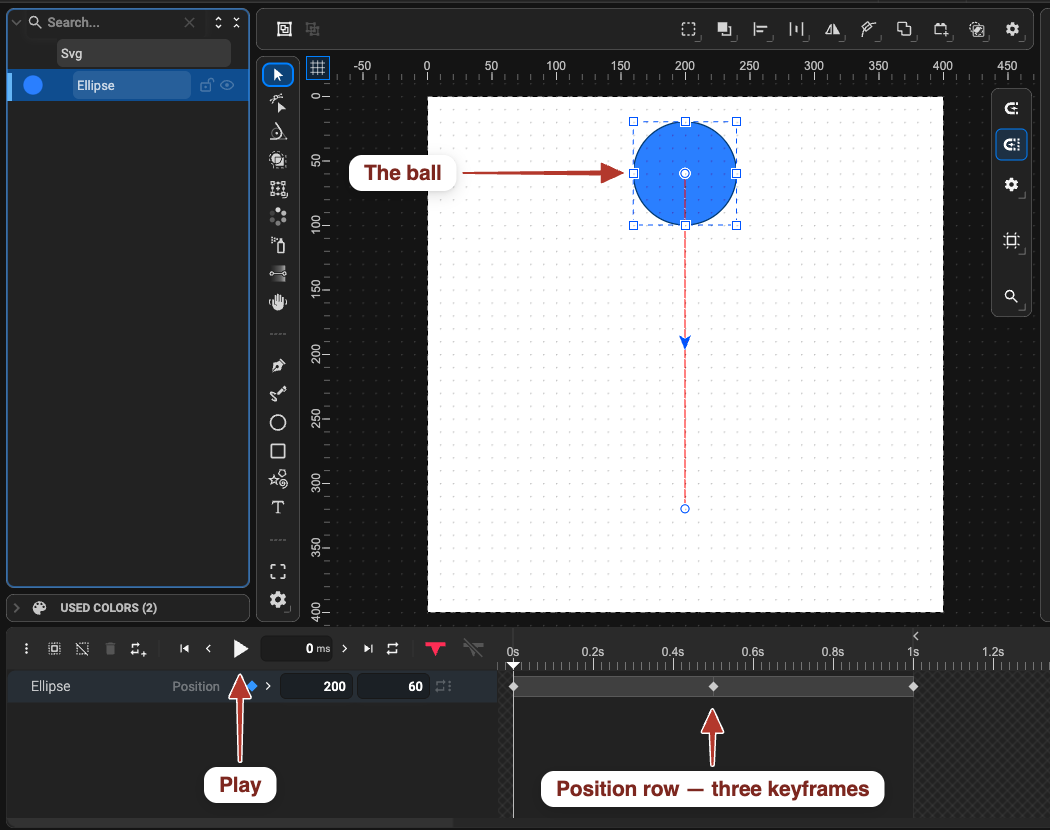
Section titled “2. Draw the ball”Press E (Ellipse), hold Shift and drag near the top of the canvas to draw a circle about
80 px wide. With the ball selected, pick a fill colour in the Colors section of the
Properties panel — a bright blue, say — and set Stroke to No Color.
3. Make it fall
Section titled “3. Make it fall”- In the timeline toolbar the time field shows
0 ms. Leave the playhead there. - In the Properties panel, open Transform and click the clock next to Position. The property is now animated; a keyframe appears in the timeline at 0 ms.
- Type
500in the time field (half a second) and press Enter — the playhead moves. - Change the Position Y value so the ball sits at the bottom of the canvas (e.g.
320). A second keyframe appears.
Press Space. The ball falls. Press Space again to stop.
4. Make it bounce
Section titled “4. Make it bounce”- Type
1000in the time field. - Set Position Y back to the starting value (e.g.
60). Third keyframe — the ball comes back up. - Click the mini chart between the first two keyframes. In the Easing Function panel pick gravity › fall (it accelerates like a real drop). Click the second segment and pick gravity › rise.
Press Space again: now it bounces. For a squash, add Scale keyframes the same way at
490 ms (100 %), 500 ms (130 % × 70 %) and 510 ms (100 %).
5. Loop it and preview
Section titled “5. Loop it and preview”Select nothing (click empty canvas): the Properties panel shows the document. In Animation switch Loop on. Click Preview in the toolbar — this is exactly what the player will show on a web page.
6. Save it
Section titled “6. Save it”Press ⌘ / Ctrl + S and save bouncing-ball.json. To get a file that needs no library, choose
File › Save As SVG (for static websites) instead, or Export it as a video or GIF.
Where next: put it on a page — Add SVG animation to your project; or keep going with Keyframes and Easing charts.
Import and Export
Section titled “Import and Export”This page is a short introduction. Importing brings other files into the document; saving and exporting get your animation out — the details are in the Save and Export sections later in the docs.
Import
Section titled “Import”Importing adds content to the current document — as opposed to opening a file, which starts a new document. Imported elements appear on the canvas and can be edited like any other objects.
SVG and Lottie files
Section titled “SVG and Lottie files”Import existing SVG and Lottie JSON animations into your current document. Imported files are added to the canvas while preserving their vector structure and animation data wherever possible.
- Drag and drop — drag the animation file from your file system and drop it directly onto the editor window, then choose Add Content in the dialog (or Replace Content to swap the whole document for it).
- Import command — choose File › Import from the application menu, then navigate to the file you want to import.
After importing, the animation elements appear on the canvas as a group and can be edited like any other objects in the document.
Images
Section titled “Images”Raster images (PNG, JPEG, WebP, GIF) can be added to the animation:
- Drag and drop — drag an image file from your file system onto the editor window. The image appears on the canvas as a new layer.
- Import command — choose File › Import and navigate to the image file.
- Copy and paste — copy an image or take a screenshot in another application, switch to the editor and choose Edit › Paste (or press the standard paste shortcut). The image is inserted into the document as a new layer on the canvas.
Fonts (.ttf)
Section titled “Fonts (.ttf)”You can import custom fonts for use in text layers. Choose File › Import Font Files (TTF) from the application menu. Once imported, the font becomes available in the Font section of the Properties panel when a text layer is selected. See Text for the font options.
Export
Section titled “Export”There are three ways to get an animation out of the editor:
- Save (
⌘ / Ctrl + S) writes the document in its file type — JSON for the Pixodesk player, or a pre-rendered SVG (CSS animation, CSS + JS triggers, or JS animation). File › Save As… and the cross-format commands (Save As JSON, Save As SVG, Save As Lottie JSON, Save As dotLottie) write another type without changing your document. Which type to pick: File formats. - Export (
⌘ / Ctrl + E) opens the export dialog for the other targets: Lottie (.json/.lottie), Video (MP4 / WebM), GIF, and a static image (PNG, JPEG, WebP, SVG) of any frame. The dialog previews the result and lists warnings for features the target cannot reproduce. - Preview shows the animation exactly as the player will play it, without saving — see Preview panel.
Then put the file on your page: Add SVG animation to your project or Add Lottie animation to your project.
Document Properties
Section titled “Document Properties”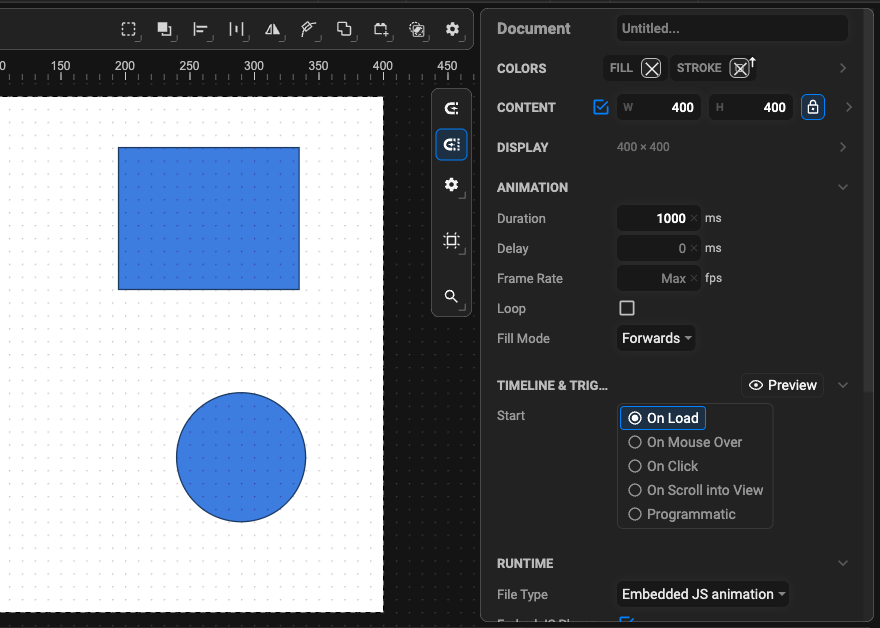
Document properties define the global settings for your animation, including canvas dimensions, playback behaviour, export format, and rendering options.
You can view and edit document properties in the Properties Panel. They are available when no object is selected, or when the root <svg/> element is selected at the top of the Object Tree.
View Box
Section titled “View Box”The View Box defines the coordinate system and visible area of the SVG canvas. It controls how the animation content is positioned and scaled within the document.
Content Start (x, y) — the starting coordinates of the view box within the SVG coordinate system.
Content Size (x, y) — the width and height of the view box.
Size Lock — when enabled, width and height scale proportionally. When disabled, they can be edited independently.
Aspect Ratio
Section titled “Aspect Ratio”Controls how the SVG content scales when the document is resized or embedded in different layouts.
Horizontal Alignment
Section titled “Horizontal Alignment”- xMin — aligns content to the left side of the viewport
- xMid — centres content horizontally
- xMax — aligns content to the right side of the viewport
Vertical Alignment
Section titled “Vertical Alignment”- yMin — aligns content to the top of the viewport
- yMid — centres content vertically
- yMax — aligns content to the bottom of the viewport
Scale Behaviour
Section titled “Scale Behaviour”- Meet — scales the animation to fit entirely inside the viewport, preserving the aspect ratio. Empty space may appear on two sides.
- Slice — scales the animation to fill the viewport completely. Parts of the animation may be clipped.
- None — disables aspect-ratio-preserving scaling and stretches the animation to match the viewport size.
Display
Section titled “Display”Width / Height — the display size of the document in the chosen unit. This controls how the SVG is rendered in a browser when no external sizing is applied.
Animation
Section titled “Animation”These properties control how the animation timeline behaves.
Duration (ms) — the total length of the animation in milliseconds.
Delay (ms) — a delay before the animation begins playing.
Frame Rate (fps) — the number of frames per second used during playback.
Loop — when enabled, the animation restarts automatically after reaching the end.
Timeline Mode
Section titled “Timeline Mode”Defines how the animation timeline progresses.
- Time — the animation plays based on elapsed time
- Scroll — the animation progress is controlled by the page scroll position
Playback Triggers
Section titled “Playback Triggers”Determines when the animation starts.
- On Load — starts automatically when the document loads
- On Mouse Over — starts when the pointer moves over the animation
- On Click — starts after a click interaction
- On Scroll Into View — starts when the element enters the viewport
- Programmatic — playback is controlled through JavaScript APIs
Reset on Finish — when enabled, the animation resets to its starting state after reaching the end of the timeline.
File Type
Section titled “File Type”The File Type defines the output format used when saving the animation.
Available formats:
- JSON file format for Lottie animation
- JSON file format for SVG animation
- SVG file format with CSS keyframes
- SVG file format with JavaScript triggers
- SVG file format with JavaScript animation
These file formats are described in Create documents, file formats.
Because the formats are interchangeable, you can change the file type at any time without losing your work.
DOM Attributes
Section titled “DOM Attributes”ID — sets a custom ID attribute on the root SVG element. Useful for targeting the animation via CSS or JavaScript.