Keyframes
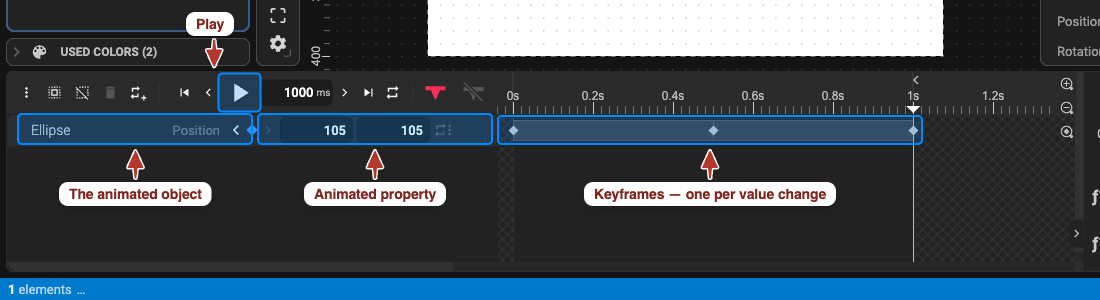
A keyframe records the value of one property at one moment. Two keyframes with different values make an animation: the editor fills in every frame in between. That is all there is to it — the rest is choosing what changes, when, and how it eases.
How Keyframes Work
Section titled “How Keyframes Work”- A property has no animation until it has two keyframes; everything between them is interpolated, everything before the first and after the last holds still.
- Add as many keyframes as you like — each is a moment the animation passes through exactly.
- Every animated property gets its own row in the timeline’s layer list, with its keyframes as diamonds. Between two diamonds, a mini chart shows the easing — click it to change the curve (Easing charts).
- Time is in milliseconds (or frames — the display switches in the timeline toolbar). The animation length is the document’s Duration (Document properties).
What You Can Animate
Section titled “What You Can Animate”Almost every property in the Properties panel that shows a clock icon:
| Group | Properties |
|---|---|
| Transform | position, rotation, scale, skew, origin |
| Appearance | opacity, fill colour and opacity, stroke colour and opacity, stroke width, dash array and offset |
| Stroke trim | start, end, offset — draw-on and erase effects |
| Shape | rectangle size and corner radius, ellipse radii, path shape (morphing), star / polygon geometry |
| Text | position, offset along a path |
| Gradients and filters | gradient stops and geometry, numeric filter settings |
| Along a path | how far an object has travelled along its motion path |
Not everything is available in every saved format — the CSS-only SVG flavour cannot animate path shapes or some filters, for example. The preview warns you; see File formats.
Add Keyframes
Section titled “Add Keyframes”Method 1 — change a value at a time
Section titled “Method 1 — change a value at a time”- Move the playhead: drag it in the timeline, type a time in the time field of the timeline toolbar, or use the previous / next frame buttons.
- Select the object.
- In the Properties panel, click the clock icon next to the property to switch on its animation (the icon stays highlighted), then change the value.
A keyframe appears at the playhead. Move the playhead, change the value again — the second keyframe is created and the motion exists. From now on, every value change while the playhead sits on a new time adds a keyframe; a change on an existing keyframe edits it.
Method 2 — pin the whole state
Section titled “Method 2 — pin the whole state”Pin Animation State at Frame (Alt + A, or the pin button in the timeline toolbar) records a
keyframe for every animated property of the selected objects at the playhead — without
touching any value. Use it to lock the current look at a moment before you change things
elsewhere: pin at 0 ms, move to 1000 ms, rearrange the objects, done. Unpin All
(Alt + Shift + A) removes all pins. More in Auto animation.
Jump between keyframes
Section titled “Jump between keyframes”Each property row in the layer list has previous / next keyframe arrows that move the playhead straight to the neighbouring keyframe, and a dot that shows whether a keyframe exists at the current time.
Select, Move and Delete
Section titled “Select, Move and Delete”In the keyframe editor (the centre of the timeline):
- Select — click a diamond; ⌘ / Ctrl + click adds to the selection; drag a box across several; Select All Keyframes / Deselect Keyframes are in the ⋮ menu.
- Move — drag selected diamonds left or right; a group moves together, keeping its spacing. Moving keyframes closer makes that part faster, further apart makes it slower — this is how you time an animation without touching values.
- Delete — select and press
Delete/Backspace, or click Remove keyframe on the property row to delete the keyframe at the playhead. - Flip Selected Keyframes (⋮ menu) — reverses their order in time, so the motion plays backwards.
Copy and Paste
Section titled “Copy and Paste”Copy keyframes to repeat a motion, or to give another object the same animation:
- Select the keyframes and press
Ctrl + C. - Move the playhead to where the copied sequence should start.
- To paste on another layer, select that layer in the Object Tree or the layer list first.
- Press
Ctrl + V. The keyframes land from the playhead onward with their original spacing; properties the target does not have are ignored.
Next
- Shape the motion between keyframes: Easing charts.
- Repeat part of it: Loop animation.