Edit Objects
Once something is on the canvas you select it, move it, transform it, stack it, align it — on the canvas, in the Object Tree, or with exact numbers in the Properties panel. This section is about those everyday operations.
Object Tree
Section titled “Object Tree”The Objects panel (left) shows everything in the document. Its top section, the Object Tree, is the element hierarchy: every shape, path, text, group, image and instance as a named row, nested as on the canvas.
*/}
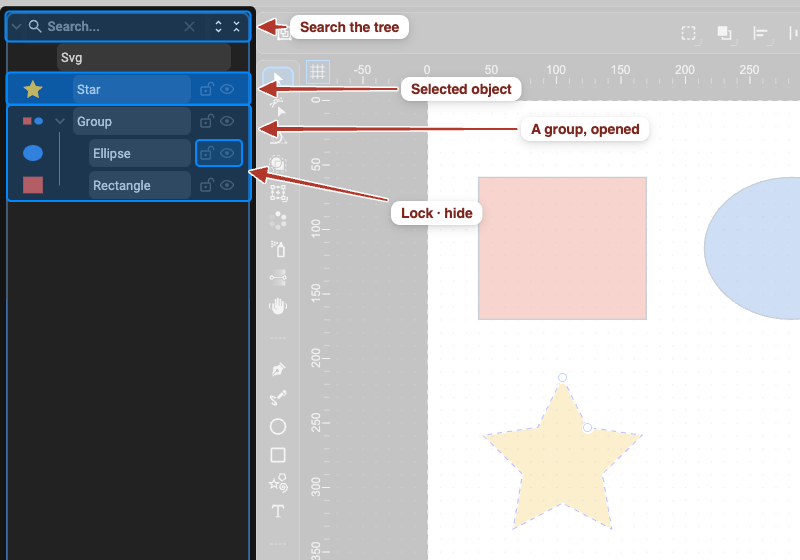
- Order = stacking. Rows higher in the list are in front on the canvas. Drag rows to reorder; drag into a group to nest.
- The
<svg/>root is always the first row. Click it to edit the document properties. - Thumbnails preview each row’s content (black when the fill is unset).
- Select — click a row; ⌘ / Ctrl + click adds rows; Shift + click selects a range.
- Rename — double-click the name, or select the row and press Enter. The name becomes
the element’s SVG
id. - Expand / collapse groups with the arrow; Expand All is at the top of the panel, and the search box filters rows by name.
- Eye and lock icons at the right of each row hide or lock it (below).
Below the tree, the panel’s other sections list the document’s reusable definitions — Symbols, Markers, Patterns, Filters — and the Used Colors. Sections collapse by clicking their header and resize by dragging their top edge; a red triangle on a collapsed header means an unused definition inside.
Properties Panel
Section titled “Properties Panel”The panel on the right shows the properties of the selection — or the document’s when nothing is selected. It is context-sensitive: a rectangle, a text and a symbol instance show different sections.
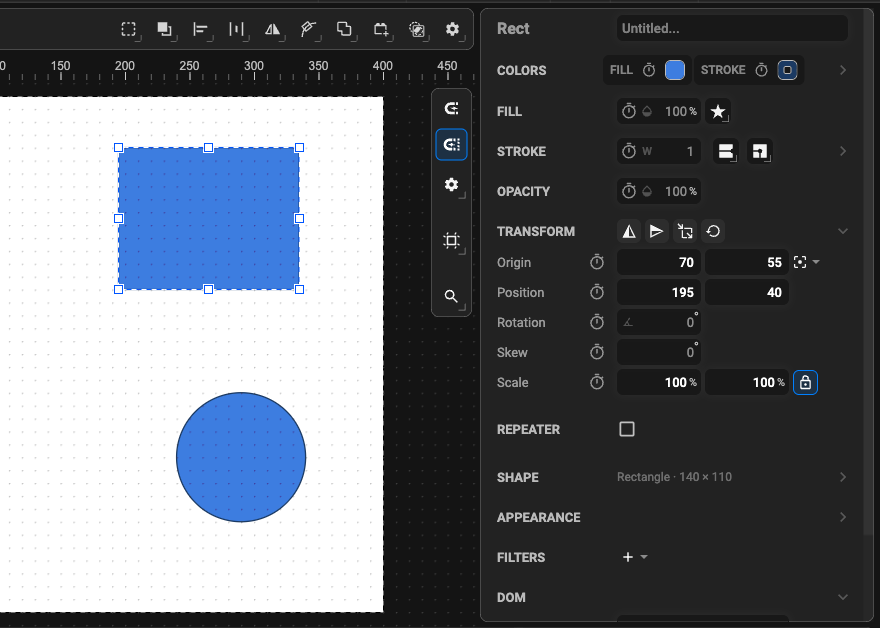
Each section has an icon, a name and a chevron to expand or collapse it; collapsed, only its first row stays visible. A clock icon next to a value means the value can be animated (Keyframes).
| Section | What it holds | Shown for |
|---|---|---|
| Colors | fill and stroke colour picker (Color) | everything |
| Fill / Stroke | fill opacity and rule; stroke width, caps, joins, dashes, trim | everything |
| Opacity (Appearance) | the object’s overall opacity | shapes, groups, instances |
| Transform | origin, position, rotation, skew, scale; flip, apply, reset | shapes, groups, instances |
| Shape | size, corner radius, points count… | shapes |
| Text, Font, Text Path | text content, font, path options (Text) | text |
| Filter | applied filters and Add Filter (Filters) | shapes, groups, instances |
| Marker | start / mid / end markers (Markers) | paths |
| Repeater | the repeater switch and settings | groups |
| Symbol / Reference, Display | what an instance or clone points at (Symbols, Clones) | instances, clones |
| Image | href, bounds, aspect ratio | images |
| Arrange, Path | align / distribute buttons; node align / distribute | shapes; paths |
| DOM Attributes | the element’s id and class — hidden by default | everything |
The narrow sections bar at the far right edge toggles each section on or off (the same toggles are in the Window menu) — it only lists sections that make sense for the selection.
Select Objects
Section titled “Select Objects”- Click an object on the canvas. Shift + click adds or removes objects; drag on empty canvas draws a selection box.
- Inside a group — hold ⌘ / Ctrl and click the object, or double-click the group to enter it.
- Everything —
Ctrl + A; nothing —⇧ ⌘ / Ctrl + Shift + Aor click empty canvas. - Previous / Next Selection — the arrows in the top bar (or the Edit menu) step back and forward through what you selected before.
- Locked objects cannot be selected on the canvas — select them in the Object Tree.
Move and Transform
Section titled “Move and Transform”With the mouse — drag with the Selection tool (S). Shift constrains to horizontal /
vertical. The Transform tool (T) adds rotate and scale handles: Shift snaps rotation to
45° and keeps the aspect ratio while scaling.
With the keyboard — arrow keys nudge 1 px; Shift + arrow nudges 10 px.
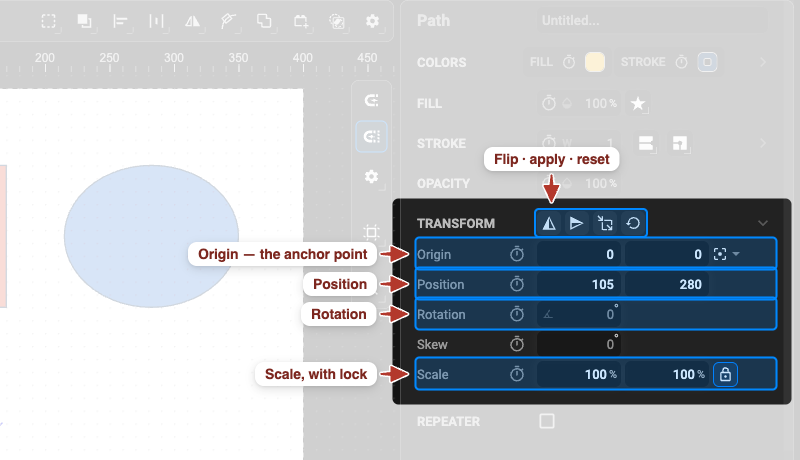
With numbers — the Transform section of the Properties panel:
| Field | Meaning |
|---|---|
| Origin | the pivot for rotation and scale; the nine-dot button snaps it to a corner, edge midpoint or the centre (also Object › Transform › Align Anchor Point, ⇧ 5 for the centre) |
| Position | X / Y on the canvas |
| Rotation | degrees, clockwise |
| Skew | shear angle |
| Scale | X / Y in %; the lock keeps both equal |
| Flip Horizontal / Vertical | mirror the object (⇧ H, ⇧ V); Rotate 45° CW / CCW is in Object › Transform |
| Apply Transform | bake the transform into the geometry and reset the fields |
| Reset Transform | discard the transform |
All transform fields are animatable — this is where most motion comes from.
Duplicate and Copy
Section titled “Duplicate and Copy”- Duplicate — Edit › Duplicate (
⌘ / Ctrl + D): an independent copy on top of the original. Copy / paste (Ctrl + C/Ctrl + V) does the same, also across documents. - Clone — a linked copy that follows the original: Clones, next.
- Symbol — many linked instances of a whole group with their own timing: Symbols.
Clones
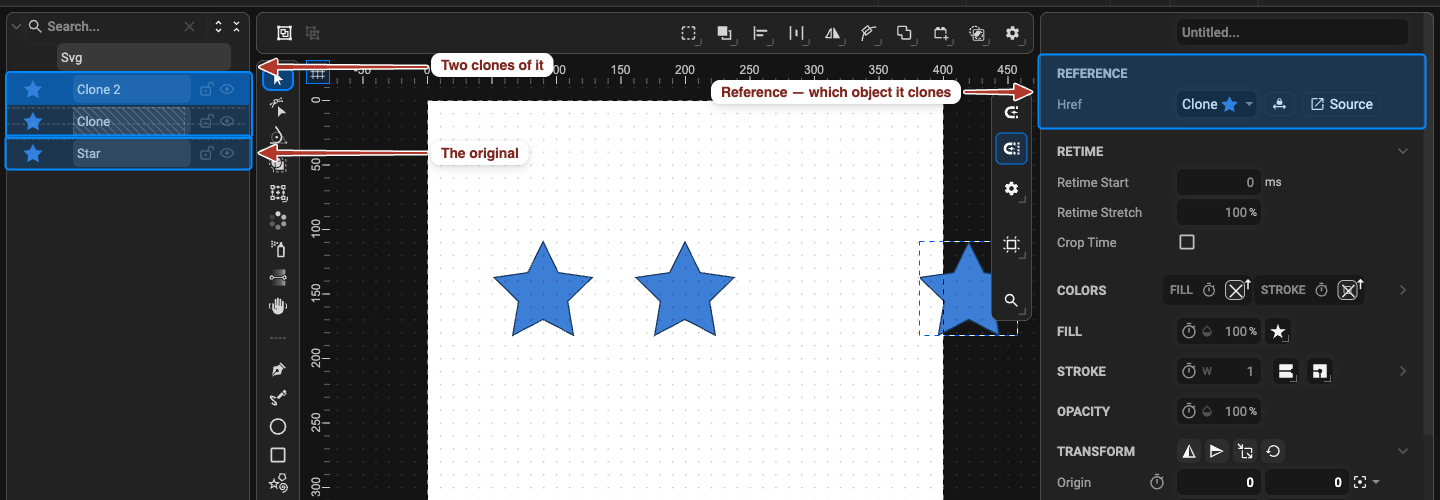
Section titled “Clones”A clone is a linked copy of one object: an SVG <use> that points at the original. Edit the
original — shape, colour, animation — and every clone follows. Clones cost almost nothing in
file size, which is what the Spray tool relies on.
- Select the object.
- Choose Edit › Clone › Create Linked Clone (
⌥ / Alt + D). The clone appears in place of the selection — drag it away.
A clone’s Properties panel has a Reference section:
- Href — what the clone shows: pick any symbol or any clone-able object in the document.
- Locks to source element location (toggle) — on, the clone appears wherever the source is and you offset it from there; off, the clone ignores the source’s own position and you place it freely.
- Source (↗) — jumps to the source object.
- Edit Symbol — when the target is a symbol, opens it for editing.
If the target is a symbol with a view box, a Display section adds Custom Size.
The rest of Edit › Clone:
| Command | What it does |
|---|---|
| Select Clone Source | selects the original(s) of the selected clone(s) |
| Select Clones | selects every clone of the selected original |
| Unlink Clone & Make Symbol | turns the source into a symbol and points the clones at it |
| Clones to Copies | breaks the link — each clone becomes an independent copy of the content |
A clone can have its own animation timing (start, stretch, crop) on top of the source’s animation, like a symbol instance.
Arrange (Stacking Order)
Section titled “Arrange (Stacking Order)”Objects render in Object Tree order. Change it with Object › Arrange — Bring to Front
(⇧ ⌘ / Ctrl + Shift + ]), Bring Forward (⌘ / Ctrl + ]), Send Backward
(⌘ / Ctrl + [), Send to Back (⇧ ⌘ / Ctrl + Shift + [) — the toolbar buttons, or by
dragging rows in the Object Tree.
Align and Distribute
Section titled “Align and Distribute”With two or more objects selected, use Object › Align / Object › Distribute, the toolbar buttons, or the Arrange section of the Properties panel.
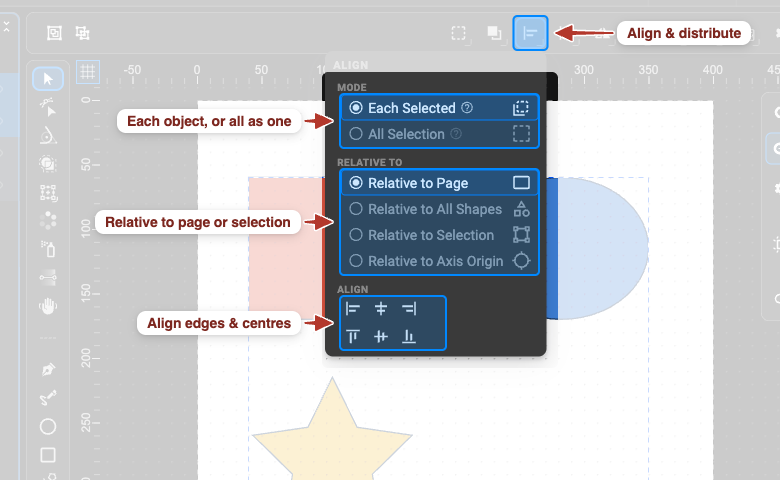
Align — first choose what moves and what it aligns to, then the edge:
- Each Selected Shape (every object individually) or All Selection (the selection as one block).
- Relative to Page, All Shapes, Selected Shapes or Axis Origin.
- Left · Center · Right and Top · Middle · Bottom.
Distribute — equal spacing along one axis, by Left / Right / Top / Bottom Edges, Centers, Gaps (equal space between objects) or Side by Side (touching).
Grid — arrange the selection into rows and columns: Grid Size, Gaps, and how each object aligns inside its cell.
Distribute Along Last Path — spaces the selected objects evenly along a path placed below them in the Object Tree; Auto-rotate turns each object to follow the path direction.
Move Along Path
Section titled “Move Along Path”Make an object travel along any path — a car on a road, a dot on a chart line:
- Draw the path and place it below the moving object in the Object Tree.
- Select both and click Move Element Along Path (toolbar or the Path section).
- Keyframe the object’s Position (now a distance along the path) — 0 % at the start, 100 % at the end, easing as you like.
Edit motion path in the Path section (with the moving object selected and the Node tool active) lets you reshape the route afterwards. Text has its own variant: Text along path.
Hide and Lock Objects
Section titled “Hide and Lock Objects”In the Object Tree, the eye hides an object (it is not rendered or exported, but stays in the document) and the lock protects it from selection and edits on the canvas. Locked objects can still be selected and edited from the tree.