Color
Every shape has a fill (the inside) and a stroke (the outline). Each can be a flat colour, a gradient, a pattern, nothing at all — or unset, so it inherits from its group. Colours are set in the Colors section of the Properties panel and animate like any other property.
Color Panel
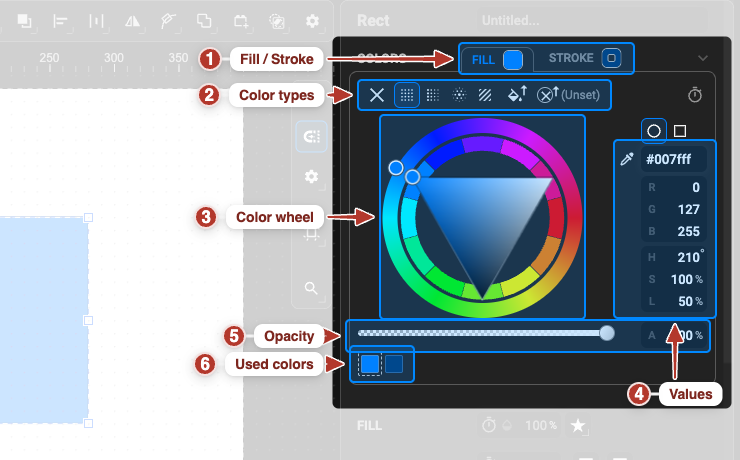
Section titled “Color Panel”Select an object; the Colors section at the top of the Properties panel is where every colour
is set. The same picker also appears in the toolbar while a drawing tool is active, and pressing
X switches the active target between fill and stroke.
- Fill / Stroke tabs — which of the two you are editing.
- Colour types — flat colour, gradient, pattern, none or unset (below).
- Colour wheel — hue ring with a saturation / brightness triangle.
- Values — HEX, and the RGB / HSL channels with A for alpha.
- Opacity — the alpha slider for the colour itself.
- Used colours — swatches of the colours already in the document (Used Colors).
Colour types
Section titled “Colour types”The icon row at the top of the tab sets the type of colour:
| Type | Meaning |
|---|---|
| No Color | no fill / no stroke |
| Flat Color | one solid colour |
| Linear Gradient | colours blending along a line |
| Circular Gradient | colours radiating from a centre |
| Pattern | a repeating tile (Patterns) |
| Unset Color | no colour of its own — inherits from the parent group (below) |
Picking a colour
Section titled “Picking a colour”- Wheel (hue ring + saturation/brightness triangle) or rectangular field — switch with the button above the picker.
- HEX field (e.g.
#d41a1a), or the RGB / HSL channels — switch models with the toggle above the numbers. - A (alpha) — the colour’s transparency, 0–100 %.
- Swatches — the colours already used in the document; click one to reuse it (Used colours).
- Eyedropper — pick a colour from anything on the canvas (below).
Colours follow SVG inheritance: a colour set on a group applies to every child that is unset.
Set the fill type and colour on the Fill tab. Two more settings sit in the Fill section:
- Fill Opacity — transparency of the fill alone (the object’s own opacity is separate, see Opacity).
- Fill Rule — how the inside of a self-intersecting or compound path is decided: Nonzero (default, by winding direction) or Even-Odd (every second overlap is a hole).
Stroke
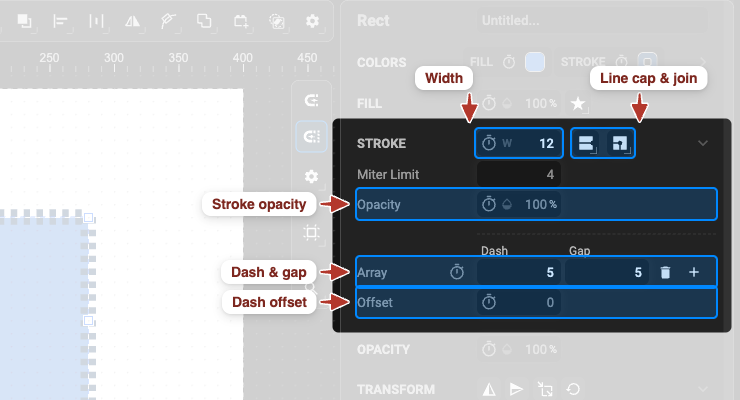
Section titled “Stroke”The Stroke tab sets the outline colour; the Stroke section sets its shape. Expand the section (the chevron on its right) to reach everything below the first row:
| Setting | Options |
|---|---|
| Width | thickness in document units |
| Line Cap | Butt (flat at the end), Round, Square (flat, extended) |
| Line Join | Miter (pointed), Round, Bevel (cut) |
| Miter Limit | how far a pointed corner may extend before it is cut off |
| Opacity | transparency of the stroke alone |
| Dash Array | tick it, then set Dash and Gap lengths; + adds more pairs |
| Offset | where the dash pattern starts along the path |
Trim Stroke (draw-on effect)
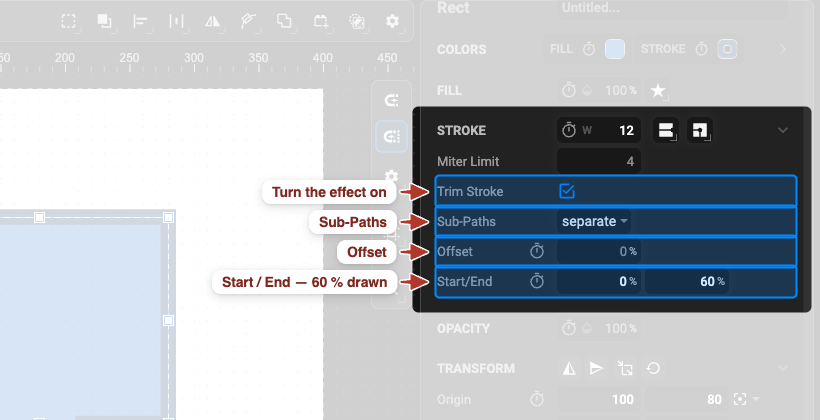
Section titled “Trim Stroke (draw-on effect)”Tick Trim Stroke to show only part of the stroke — the basis of every “line drawing itself” animation:
- Start / End — the visible portion, in % of the path length (0 % → 100 % shows everything). Keyframe End from 0 % to 100 % and the line draws on; keyframe Start and it erases.
- Offset — slides the visible portion along the path without changing its length; animate it for a travelling dash or a looping progress ring.
- Sub-Paths — for a shape made of several separate paths: separate trims each one on its own, combined treats them as a single continuous stroke.
Trim Stroke and a dash array are alternatives: tick Trim Stroke and the Dash Array row is hidden, and vice versa — the effect takes over the dash attributes it is built on.
Linear and Radial Gradients
Section titled “Linear and Radial Gradients”Choose Linear Gradient or Circular Gradient on the Fill or Stroke tab. A gradient has stops — colours at positions along it — each with its own colour and alpha.
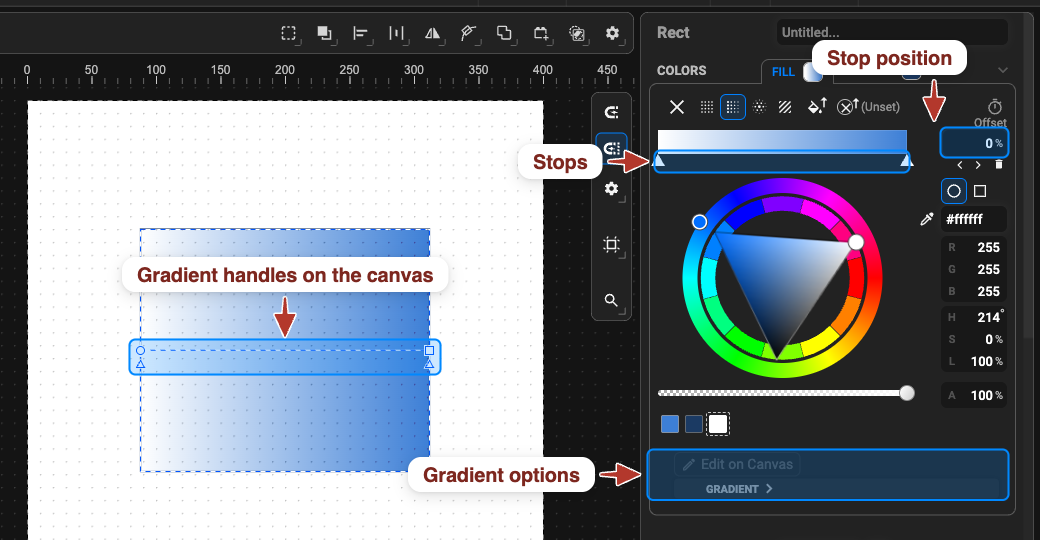
- Stops — click a stop in the colour strip to edit it; the
‹›buttons step through stops; the bin removes the selected stop. - Gradient tool (
G) — drag the handles on the canvas to move, rotate or stretch the gradient. For a radial gradient the toolbar’s Focal Point toggle adds a handle for the brightest point. - Linear options — Start / End (direction), Position, Rotation, Scale.
- Radial options — Center, Radius, Focal Point.
- Gradient Units — objectBoundingBox (relative to the shape, scales with it) or userSpaceOnUse (document coordinates, shared across shapes).
- Spread Method — what happens beyond the ends: pad (extend the last colour), reflect (mirror), repeat.
Gradient stops and geometry are animatable.
Pattern
Section titled “Pattern”Choose Pattern on the Fill or Stroke tab and pick a pattern from the list — your own patterns first, then the built-in ones. The Pattern section then controls how the tile is placed: Translation, Rotation, Scale, and the tile grid (Tile Start / Tile Size). Pattern Fill / Stroke sets the colour of the tile’s shapes.
Creating and editing your own patterns: Patterns.
Unset Color
Section titled “Unset Color”Unset means “no colour of my own”. The shape takes its fill or stroke from the nearest group above it that has one. Put the colour on the group, keep the shapes unset, and recolouring the whole illustration is one click — great for icons with a theme colour.
Opacity
Section titled “Opacity”There are three opacities, and they multiply:
- Colour alpha (the A slider) — transparency of that one colour or gradient stop.
- Fill / Stroke Opacity (Fill and Stroke sections) — the fill or the stroke as a whole.
- Object opacity (Appearance section) — the whole object, including its children. Use this one for pattern fills and for fading objects in and out.
Eyedropper
Section titled “Eyedropper”- Select the object to recolour and make Fill or Stroke the active tab.
- Pick the Eyedropper in the Tools panel.
- Click any object on the canvas — its colour is copied into the active tab.
Used Colors
Section titled “Used Colors”The Used Colors section at the bottom of the Objects panel lists every colour in the document — fills, strokes and gradient stops — and updates as you work.
- Reuse — with an object selected, click a swatch to apply it to the active fill or stroke.
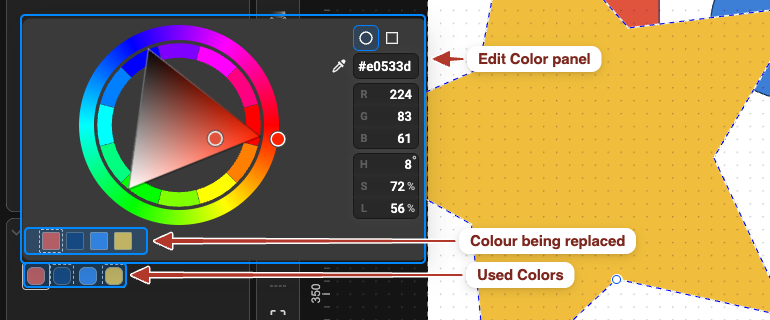
- Replace everywhere — click a swatch with nothing selected and the Edit Color panel opens: its own row shows the document’s colours, the highlighted one is the colour you are changing, and picking a new one from the wheel or HEX field updates every shape using it at once — a one-click theme change.