Canvas
The tools and the toolbar, what is shown on the canvas, its size, snapping, and moving around it.
Tools and Toolbar
Section titled “Tools and Toolbar”Tools panel
Section titled “Tools panel”Pixodesk SVG Animator provides a set of tools for creating vector graphics directly on the canvas. They live in the Tools panel, the vertical strip of buttons on the left side of the workspace. The tools build shapes, text and custom paths that can later be animated in the timeline.
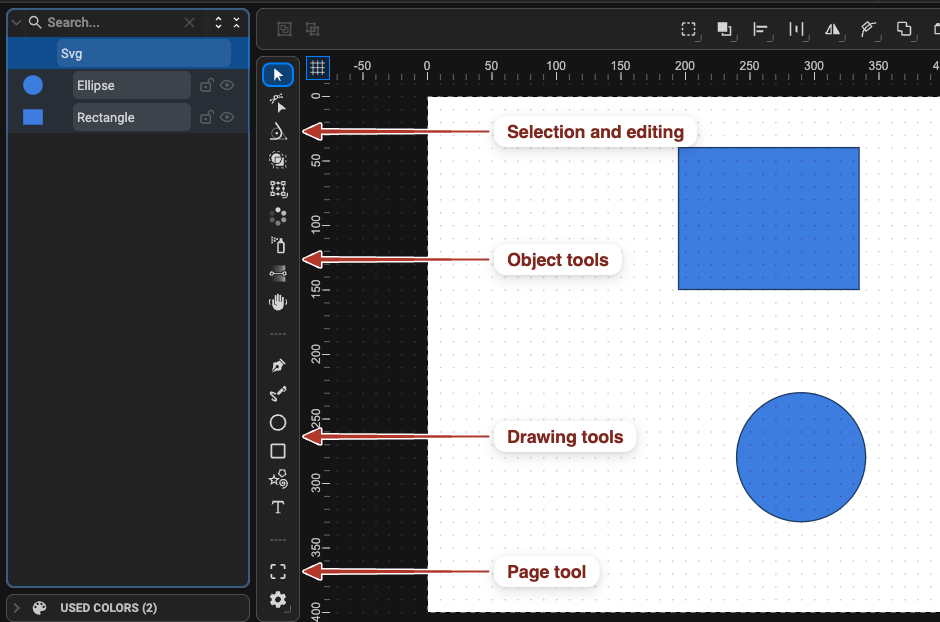
Selecting a tool changes the active editing mode, which in turn determines:
- what the Toolbar shows (context-sensitive action buttons and options — see below),
- what the Properties panel shows on the right,
- how mouse interactions work on the canvas.
Tools are grouped by function, separated by a divider. The tables give the short version; Tool by tool describes each tool.
Selection and editing:
| Tool | Shortcut | Description |
|---|---|---|
| Selection Tool | S | Select and move objects |
| Node Tool | N | Edit individual bezier nodes on paths |
| Round Corner | C | Selectively round corners on vector shapes |
| Shape Builder | B | Merge, subtract, and extract overlapping areas of shapes |
| Transform Tool | T | Scale and rotate objects using a transform box |
Object tools:
| Tool | Shortcut | Description |
|---|---|---|
| Repeater Tool | Y | Create radial or linear arrays of an object |
| Spray | — | Distribute multiple instances of an object across the canvas |
| Gradient Tool | G | Create and edit gradient fills |
| Hand Tool | H | Pan the canvas |
Drawing tools:
| Tool | Shortcut | Description |
|---|---|---|
| Pen Tool | P | Draw freeform Bézier paths and curves |
| Freehand Tool | F | Draw paths by freehand, converted to smooth bezier curves |
| Ellipse Tool | E | Draw ellipses and circles |
| Rectangle Tool | R | Draw rectangles and squares |
| Shape Tool | W | Draw stars, polygons, or spirals — select the sub-type in the Toolbar |
| Text Tool | Shift + T | Create and edit text elements |
The Page tool (no shortcut) sits below the divider. The full shortcut list is on Keyboard shortcuts.
Toolbar
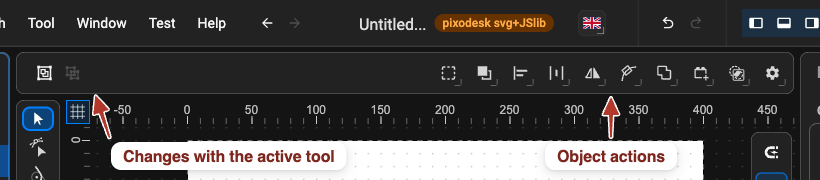
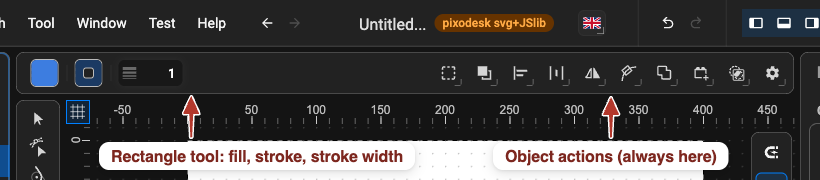
Section titled “Toolbar”The Toolbar is the horizontal bar above the canvas. The left side is context-sensitive — its content changes with the active tool selected in the Tools panel. The right side holds the object actions — edit, arrange, align, distribute, transform, motion path, shape path, symbols and masks — which stay in place whichever tool is active.
Persistent controls
Section titled “Persistent controls”These controls are always available, and they sit in two places outside the tool options: Undo / Redo, Layout, Preview and Export are in the app bar along the very top of the window, while Snap, Canvas and Zoom are on the narrow vertical strip down the right-hand edge of the canvas.
Undo / Redo
Section titled “Undo / Redo”- Undo
Ctrl/Cmd+Z— reverse the last action - Redo
Shift+Ctrl/Cmd+Z— reapply the last undone action
Two toggle buttons and a settings dropdown control snapping behaviour:
- Snap to Other — toggle snapping to other objects on the canvas
- Snap to Step — toggle snapping to grid intervals and angle steps
- Snap settings (dropdown) — detailed snap configuration:
- Snap/Align to Other — enable object-to-object snapping and alignment
- What is snapped: Bounding Box Corners and Midpoints, Shape Path Nodes, Control Points
- Snap to: Bounding Box Corners and Midpoints, Shape Path Nodes, Page Borders and Midpoint
- Align to: Bounding Box Corners and Midpoints, Shape Path Nodes, Page Borders and Midpoint
- Snap to Closest Point on Path — snap to the nearest point along any path
- Snap threshold — pixel distance within which snapping activates
- Snap to Step — snap movement to a fixed grid interval (configurable step size)
- Snap Rotation to Angle Step — constrain rotation to fixed angle increments
- Snap/Align to Other — enable object-to-object snapping and alignment
Every option is explained on Snap.
Canvas
Section titled “Canvas”The Canvas dropdown controls what is shown on and around the canvas:
- Show Ruler — toggle the rulers along the top and left edges
- Show Grid — overlay a grid on the canvas
- Show Canvas Outline — show the canvas boundary outline
- Clip Canvas Content — hide objects outside the canvas boundary
- Show Canvas Background — show or hide the canvas background fill
- Canvas Background — colour picker to set the canvas background colour
Details: Canvas display options.
The Zoom dropdown provides zoom shortcuts:
- Zoom in
- Zoom out
- Zoom 100% — reset to actual size
- Zoom to Fit — fit the content in the available space
- Zoom to Page — fit the canvas boundary in the view
- Zoom to Selection — zoom to the current selection
- Zoom Timeline to Frame Range — fit the timeline view to the animation duration
Details: Zoom.
Layout
Section titled “Layout”The Layout dropdown controls panel and timeline visibility:
- Maximize Canvas — hide all panels to maximise the canvas area
- Left Panel — show or hide the Objects panel (left side)
- Bottom Panel — show or hide the Timeline panel (bottom)
- Right Panel — show or hide the Properties panel (right side)
- Show Keyframes — toggle the keyframe editor within the Timeline panel
- Show Charts — toggle the chart panel within the Timeline panel
See Workspace panels.
Dark / Light theme
Section titled “Dark / Light theme”Toggle between dark and light application themes.
Show Preview panel
Section titled “Show Preview panel”Open or close the Preview panel — an inline browser frame that renders your animation live without saving.
Export
Section titled “Export”Open the export dialog to save or download the animation in the configured file format. See Export options.
Tool by tool
Section titled “Tool by tool”What the Toolbar’s left side shows depends on the active tool; each entry below ends with its Toolbar shows line.
Selection Tool S
Section titled “Selection Tool S”Select, move, and resize objects. Click to select individual objects or groups. Double-click a
group to select an object inside it. Hold Ctrl/Cmd to add objects to a multi-selection.
Toolbar shows: Group / Ungroup, Make Symbol, Make Marker, Make Pattern, Arrange, Align, Distribute, Flip, Move Along Path, Mask, Path operations (Union, Subtract, Intersect, Exclude, Divide) — the standard object actions. The same set appears for the Transform and Hand tools.
Node Tool N
Section titled “Node Tool N”Edit the nodes and path segments of a selected vector path. Select nodes by clicking individually or dragging a selection rectangle. Drag nodes to reshape the path. Double-click a path to add a node.
Toolbar shows: Add Node, Remove Node, Break at Points, Path Start, Reverse Path, node type buttons (Cusp, Smooth, Symmetric, Auto-Smooth), Path operations, Align / Distribute nodes. See Edit paths.
Round Corner C
Section titled “Round Corner C”Round, bevel, or invert the corners of shapes. Click a corner node and drag to adjust the radius.
Toolbar shows: Corner Radius (numeric input), Corner Type (Round / Bevel / Inverted Round), Convert to Curves (convert the shape to a fully editable path). See Round corners.
Shape Builder B
Section titled “Shape Builder B”Combine or subtract overlapping shapes interactively by clicking or dragging across them.
Toolbar shows: Mode buttons — Add, Remove, All, Subtract, Intersect, Exclude, Deselect. See Shape builder.
Transform Tool T
Section titled “Transform Tool T”Move, rotate, and scale objects using transform handles. Hold Shift to constrain movement to
horizontal / vertical, constrain rotation to 45° increments, or keep the aspect ratio when scaling.
Toolbar shows: the same object actions as the Selection tool. See Transform.
Repeater Tool Y
Section titled “Repeater Tool Y”Create circular or linear repeating patterns from a selected object.
Toolbar shows: Count input, Add Circular Repeat, Add Linear Repeat, Add one clone / Remove one clone, Cancel Repeat. See Repeater.
Spray copies of a selected object across the canvas with randomised size, rotation, and opacity.
Toolbar shows: Spray Radius (the area in which copies are sprayed), Amount (copies per stroke), Rotation (variation applied to copies), Min / Max Scale, Min / Max Opacity. See Spray.
Gradient Tool G
Section titled “Gradient Tool G”Adjust gradient control points for objects with a linear or radial gradient fill or stroke.
Toolbar shows: Focal Point toggle (on / off) for radial gradients. See Linear and radial gradients.
Hand Tool H
Section titled “Hand Tool H”Pan around the canvas without affecting content. Click and drag to scroll the view.
Toolbar shows: the standard object actions. See Pan.
Pen Tool P
Section titled “Pen Tool P”Draw precise vector paths by clicking to place nodes. Click for straight segments; click and drag
for curves. Double-click or press Escape to finish. Close the path by clicking the start node.
Toolbar shows: Fill / Stroke colour pickers, Stroke Width, Path operations. See Bezier paths.
Freehand Tool F
Section titled “Freehand Tool F”Draw freehand paths by clicking and dragging. The path follows your cursor movement and is converted to smooth bezier curves.
Toolbar shows: Fill / Stroke colour pickers, Stroke Width.
Ellipse Tool E
Section titled “Ellipse Tool E”Draw ellipses and circles. Hold Alt/Option to draw from the centre. Hold Shift to constrain
to a circle.
Toolbar shows: Fill / Stroke colour pickers, Stroke Width. See Ellipses.
Rectangle Tool R
Section titled “Rectangle Tool R”Draw rectangles and squares. Hold Alt/Option to draw from the centre. Hold Shift to constrain
to a square.
Toolbar shows: Fill / Stroke colour pickers, Stroke Width. See Rectangles.
Shape Tool W
Section titled “Shape Tool W”Draw stars, polygons, and spirals. When the Shape tool is active, three sub-type buttons appear in the Toolbar:
- Star — a star shape with a configurable number of points
- Polygon — a regular polygon with a configurable number of sides
- Spiral — a spiral with a configurable number of turns
Toolbar shows: Fill / Stroke colour pickers, Stroke Width, Shape type (Star / Polygon / Spiral). See Stars, Polygons, Spiral.
Text Tool Shift + T
Section titled “Text Tool Shift + T”Add and edit text. Click on the canvas to place a text object.
Toolbar shows: Fill colour, Font Type, Font Family, Font Style, Font Size, Put Text on Path, Text to Bezier Shape. See Text.
Page Tool
Section titled “Page Tool”Select and reposition the page (canvas boundary) within the viewport, and resize the canvas by dragging its handles. The Toolbar shows no tool-specific controls — use the persistent Canvas, Zoom and Layout dropdowns. See Change canvas size.
Grouping
Section titled “Grouping”Objects can be grouped to behave as a single unit, making it easier to move, transform, and manage them together. See Groups.
Rulers, Grid and Background
Section titled “Rulers, Grid and Background”The canvas is the white page in the middle of the workspace: your document, at the current zoom. Objects can sit outside its edge — they stay in the document but are cut off in the output. What is drawn around the page is up to you; the Canvas dropdown on the canvas toolbar (the icon strip down the right-hand edge of the canvas) and the View menu hold the switches:
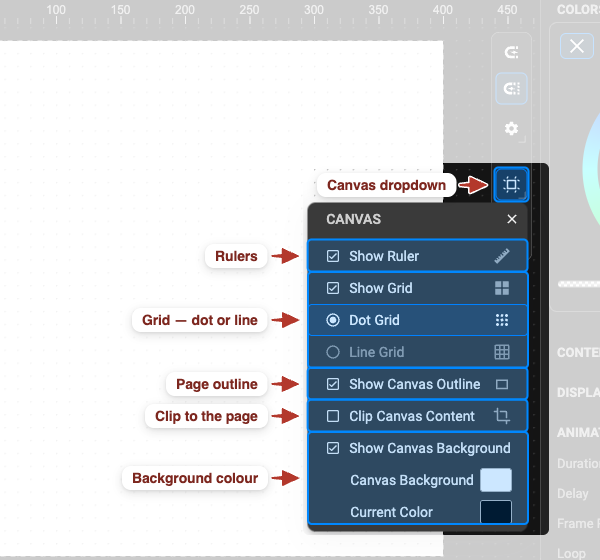
| Option | What it does | Shortcut |
|---|---|---|
| Show Ruler | rulers along the top and left, in document units | ⌘ / Ctrl + ; |
| Show Grid | an alignment grid over the page — Dot Grid or Line Grid (switch in the dropdown); never exported | ⌘ / Ctrl + ' |
| Show Canvas Outline | a border on the page edge | — |
| Clip Canvas Content | hide whatever lies outside the page, as the output will | ⇧ ⌘ / Ctrl + Shift + / |
| Show Canvas Background / Canvas Background | a solid colour behind the page and its picker — a viewing aid only, not part of the file | ⌘ / Ctrl + / |
The grid is for your eyes; to make objects snap to it, see Snapping.
Change Canvas Size
Section titled “Change Canvas Size”The canvas size is the document’s view box. Two ways to change it:
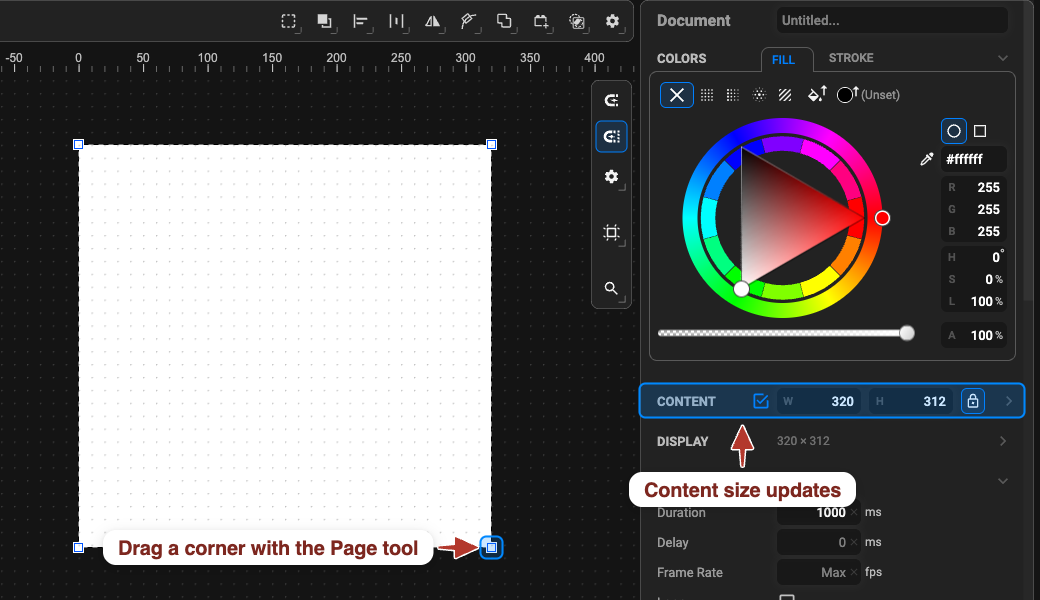
- Numbers — select nothing (or the
<svg/>root) and set W and H on the Content row of the Properties panel. The lock beside them keeps width and height proportional; the Display row below shows the size the animation is placed at. - On the canvas — pick the Page tool (bottom of the Tools panel) and drag a corner of the page.
Resizing the page does not scale the artwork; move or scale the objects afterwards if needed. How the page scales when it is placed on a web page — Aspect Ratio (meet / slice, alignment) and Display size — is set in the same place: Document properties.
Snapping to Objects and Grid
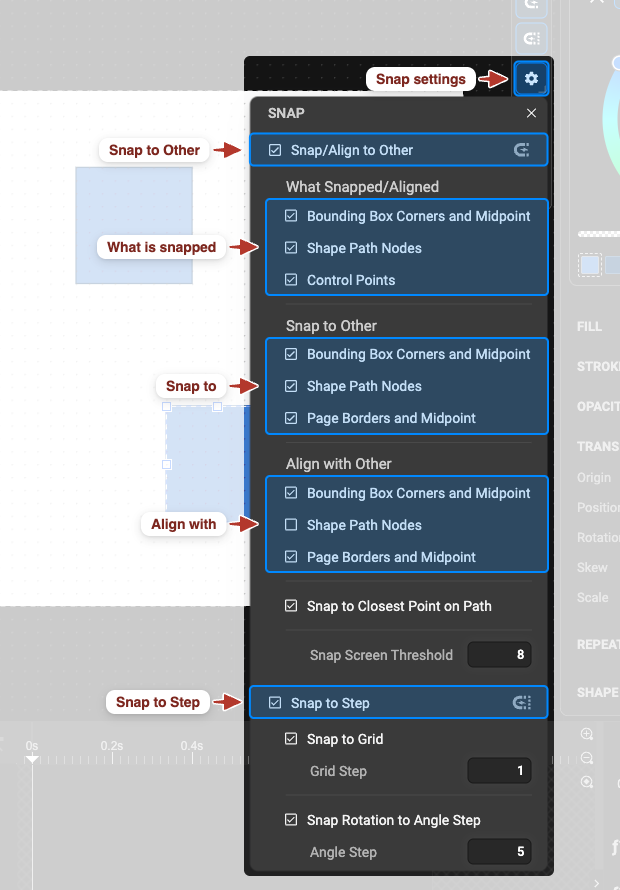
Section titled “Snapping to Objects and Grid”Snapping pulls what you drag — objects, nodes, control points — onto nearby geometry so things line up without zooming in. Everything lives in the Snap dropdown on the canvas toolbar (the icon strip down the right-hand edge of the canvas): two master switches — Snap/Align to Other and Snap to Step — each with its own group of options underneath.
Snap / Align to Other
Section titled “Snap / Align to Other”Snaps to other objects and to the page.
| Setting | Choices |
|---|---|
| What is snapped (points on the object you drag) | Bounding Box Corners and Midpoint · Shape Path Nodes · Control Points |
| Snap to (points on other objects) | Bounding Box Corners and Midpoint · Shape Path Nodes · Page Borders and Midpoint |
| Align with (guide lines that appear when edges or centres line up) | Bounding Box Corners and Midpoint · Shape Path Nodes · Page Borders and Midpoint |
| Snap to Closest Point on Path | snap onto the nearest point of any path, not only its nodes |
| Snap Screen Threshold | how close (in screen pixels) before snapping kicks in |
Snap to Step
Section titled “Snap to Step”Snaps movement and rotation to fixed increments.
| Setting | Meaning |
|---|---|
| Snap to Grid + Grid Step | move in steps of the grid spacing |
| Snap Rotation to Angle Step + Angle Step | rotate in fixed angle steps (e.g. 15°) |
Hold Shift while drawing or transforming for the classic constraints (square / circle, 45° rotation) even with snapping off.
Pan and Zoom
Section titled “Pan and Zoom”Pan and zoom only change how the canvas appears on screen — they never affect the document or the final output.
Panning moves the canvas view without changing zoom level or affecting objects. Use it to scroll around a large document or to reposition the view after zooming in.
How to Pan
Section titled “How to Pan”- Hand Tool
H— select the Hand Tool, then click and drag anywhere on the canvas to pan freely - Space + drag — hold
Spacewith any tool active to temporarily switch to the Hand Tool; releaseSpaceto return to the previous tool - Middle mouse button drag — hold the middle mouse button and drag to pan
- Scroll — scroll vertically with the mouse wheel; hold
Shiftto scroll horizontally
Zoom controls adjust the magnification of the canvas view. They do not affect the document or the final output — only how the canvas appears on screen.
How to Zoom
Section titled “How to Zoom”- Ctrl/Cmd + scroll — zoom in and out at the cursor position
+/-keys — zoom in or out by one step- Zoom dropdown in the toolbar — access named zoom levels and fit options
Zoom Options
Section titled “Zoom Options”- Zoom In — increase magnification one step
- Zoom Out — decrease magnification one step
- Zoom 100% — reset to actual size (1:1 pixel ratio)
- Zoom to Fit — fit all document content within the visible window
- Zoom to Page — fit the canvas boundary within the visible window
- Zoom to Selection — zoom in to focus on the currently selected objects
Timeline Zoom
Section titled “Timeline Zoom”To adjust the horizontal zoom of the timeline view (how many frames are visible), use the Zoom control in the Timeline Panel. The Zoom Timeline to Frame Range option in the Zoom dropdown also fits the timeline view to the full animation duration.