Animation Overview
Animation in Pixodesk SVG Animator is keyframe-based and lives in the Timeline panel at the bottom of the workspace. This section is the map: the ways to animate, what the panel does, auto-pinning in detail, how the animation is played and started on the page, and how to drive it with the page scroll.
Ways to Animate
Section titled “Ways to Animate”There are three ways to put motion into a document. They produce the same thing — keyframes — and you will use all three.
| Way | How | Best when |
|---|---|---|
| Keyframes by hand | switch a property’s clock on, move the playhead, change the value | you want one property to do one precise thing — a fade, a slide, a colour change |
Auto-pin (Alt + A) | pin the current state, move in time, change anything about the object | building a whole pose-to-pose motion quickly; several properties at once |
| Pin several states | pin at each key moment, adjust the object each time | storyboarding: lay out all the key poses first, refine timing and easing after |
Add-ons that apply to any of them: easing between keyframes, inner loops for repeats, and the techniques page for motion along a path, draw-on strokes, morphing, colour, masks and more.
Timeline Panel
Section titled “Timeline Panel”
Three areas, left to right:
- Layer list — every animated object and, under it, one row per animated property.
- Keyframe editor — the time ruler, the playhead, keyframe diamonds and the easing mini charts between them.
- Chart panel — the value / velocity / acceleration curves (Easing charts).
Playback toolbar
Section titled “Playback toolbar”| Control | What it does |
|---|---|
| ⋮ | Show Velocity Mini Charts · Select All Keyframes · Deselect Keyframes · Delete Selected Keyframes · Add / Remove Inner Loop · Flip Selected Keyframes |
| ⏮ ◀ ▶ ▶ ⏭ | go to start (⌘ / Ctrl + ←), previous frame, play / pause (Space), next frame, go to end (⌘ / Ctrl + →) |
| time field | the playhead position — type a time (ms) or a frame number, or drag it |
| Loop | repeat playback in the editor (Loop animation) |
| Pin / Unpin All | pin the current state (Alt + A) / clear all pins (Alt + Shift + A) — see Auto animation |
Layer list
Section titled “Layer list”Layers with animated properties expand to show one row per property. A row has a keyframe dot (is there a keyframe at the playhead?), previous / next keyframe arrows, the property’s value at the playhead (editable), and a loop button for an inner loop. Expand All opens every layer.
Keyframe editor
Section titled “Keyframe editor”The ruler shows time in seconds; the highlighted range is the document’s Duration (Document properties). Drag the playhead to scrub. Keyframes are diamonds; select, drag, copy and delete them as described in Keyframes. Click the mini chart between two keyframes to edit that segment’s easing. Zoom (top-right of the panel, or View › Zoom Timeline to Frame Range) changes the time scale.
Time or frames
Section titled “Time or frames”The time field shows milliseconds; click its unit to switch to frames. The document’s Frame Rate (Animation section; Max = uncapped) defines the frame grid.
Auto Animation
Section titled “Auto Animation”The fastest way to animate: pin a state, move in time, change things. Pinning records a keyframe for every animated property of the selected objects at the playhead, so you never touch individual values.
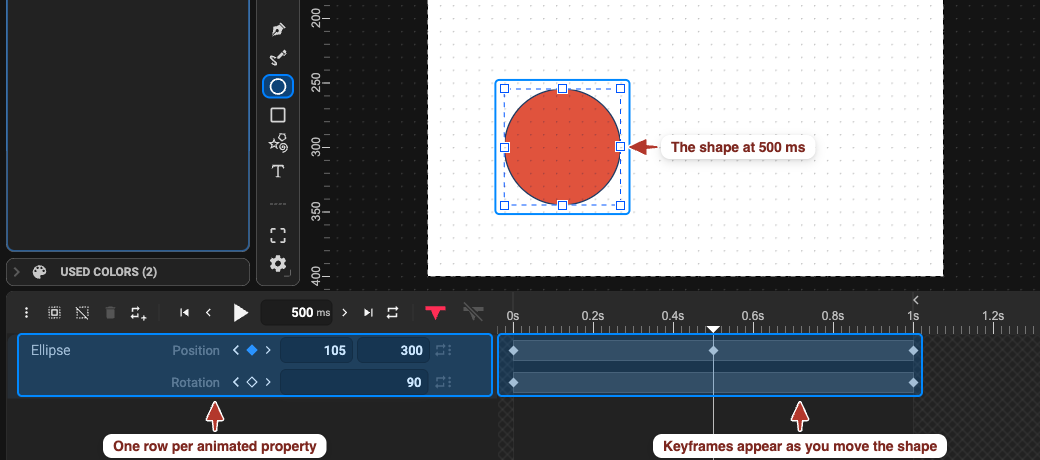
- Set the playhead where the current look should hold (usually
0 ms). - Click Pin Animation State at Frame (
Alt + A). - Move the playhead — the editor jumps forward one second by default; drag it elsewhere if you want a different interval.
- Change the object: move it, rotate it, recolour it, reshape it. Keyframes appear automatically for whatever changed.
- Repeat 2–4 for each state. Unpin All (
Alt + Shift + A) clears the pins when you are done.
Pins are a working mode, not part of the file; the keyframes they create are. Use several pins to lay out the key states first and refine timing and easing afterwards.
Playback and Triggers
Section titled “Playback and Triggers”How the saved animation plays on the page is set on the document (select nothing): the Animation section and the Timeline & Trigger section of the Properties panel.
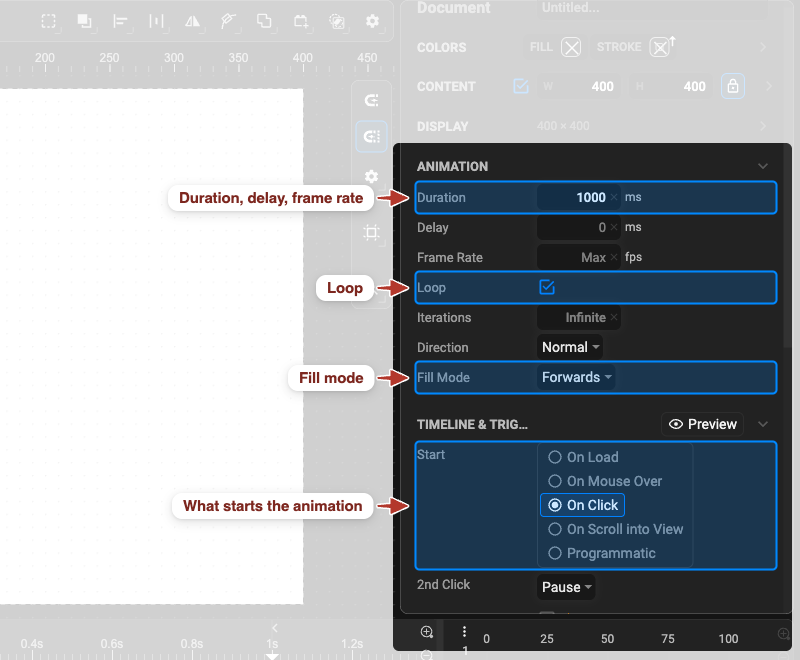
Timing
Section titled “Timing”| Setting | Meaning |
|---|---|
| Duration (ms) | the length of the animation — also the timeline range |
| Delay (ms) | wait before it starts |
| Frame Rate (fps) | the frame grid; Max = as fast as the player can (JS modes) |
| Loop | repeat when finished; with Loop on: Direction — Normal · Reverse · Alternate · Alternate Reverse — and Iterations (empty = infinite) |
| Fill Mode | what shows outside the active time — Forwards holds the last frame after the end, Backwards shows the first frame during the delay, Both does both, None reverts to the static artwork |
| Reset on Finish | jump back to the first frame at the end (hidden for On Load, and unavailable while looping) |
Start trigger
Section titled “Start trigger”Start decides what starts the animation:
| Start | Then… | Out-action (when it ends) |
|---|---|---|
| On Load | plays as soon as the page shows it | — |
| On Mouse Over | plays while the pointer is over it | On Mouse Out: Pause · Reset · Continue |
| On Click | plays after a click | 2nd Click: Pause · Reset · Continue |
| On Scroll into View | plays when it enters the viewport; Threshold (%) sets how much must be visible | On Scroll Out: Pause · Reset · Continue |
| Programmatic | nothing — your code starts it through the player API | — |
Pause resumes later from the same spot, Reset returns to the start, Continue keeps playing.
Triggers and the CSS-only file
Section titled “Triggers and the CSS-only file”A pure-CSS SVG can express On Load, On Mouse Over (with Pause on mouse out) and Programmatic. Choosing On Click or On Scroll into View — or Reset / Continue — switches the file to the SVG + CSS + JS triggers flavour automatically (a few embedded lines). The JSON and SVG + JS formats support everything. See File formats.
Use Preview (toolbar) to try the triggers exactly as the player runs them.
Scroll-driven Animation
Section titled “Scroll-driven Animation”Instead of time, the animation can follow the page scroll: the reader scrolls, the animation advances — parallax, progress indicators, stories that unfold as you read. Set Timeline to Scroll in the Timeline & Trigger section (the switch is available when the document is already scroll-driven or experimental features are enabled in the preferences).
Start from a Preset — it fills in all the fields below:
| Group | Presets | The animation plays… |
|---|---|---|
| Enter | Enter · Enter to center · Late enter | while the canvas arrives on screen |
| Journey | Full journey · Middle half · On-screen journey · Long enter · Long exit | as the canvas crosses the screen (On-screen journey: only while fully visible) |
| Hold & play | at top · at middle · at bottom · Card stack | while the canvas is pinned in place and the page scrolls past |
| Exit | Exit · Exit from center · Early exit | while the canvas leaves |
| Page | Whole page · This panel | following the page (or a panel) scroll, not the canvas |
The fields, for fine-tuning (the preset shows custom once you edit them):
- Driver — Built-in (the player measures scroll itself; identical in every browser) or Native (the browser’s scroll timeline; falls back to Built-in where unavailable).
- Progress — Element (how far this canvas has travelled across the screen) or Container (how far a scrollable area has scrolled — for a fixed-position canvas such as a progress bar), with Scroller Nearest / Page.
- Axis — Block / Inline (follow the writing direction) or X / Y.
- Measure — what is tracked: This canvas · Parent section · Scroll container · a custom CSS selector.
- Smoothing (ms) — how long the animation takes to catch up with the scrollbar; empty locks it exactly (needs the Built-in driver).
- Pin (Sticky) — holds the canvas on screen while the scroll plays it, with Offset, Length (in screens) and Align Top / Middle / Bottom (Middle and Bottom need the JS player).
- Start / End — the phase (Cover · Contain · Entry · Exit · Entry crossing · Exit crossing) and percentage where the animation begins and ends; the diagram updates as you drag.
Scroll-driven documents save to JSON and to the SVG + JS flavour; the player docs cover the runtime side in Playback and triggers.
Next
- The mechanics: Keyframes · Easing charts · Loop animation.
- Getting it onto a page: Save · Add SVG animation to your project.